Welcome to Cricut 101: Lesson 3!
Today I am going to focus on Cricut Cartridges. This post is mostly going to be a lot of writing and explaining so I hope you will bear with me!
In order to use your Cricut Machine you must own at least one cartridge. Most machines come with the "George and Basic Shapes" Cartridge. It's a great one! It has a super cute font and basic shapes, just like it says :)
Each cartridge comes in a box with a handbook that shows you all the different cuts that the cartridge can make.
Here is a tip before buying a new cartridge....Go to the Cricut Website under Products and you can look at each cartridges digital handbook! It's like having the real thing in front of you. So before you buy, you know exactly what it will cut. The back of the cartridges box only shows a very small amount of the cuts that are possible.
For example, click HERE to see the digital handbook for one of my favorite cartridges "Create a Critter".
I think I mentioned in my last lesson that it took me a while to figure out how the cartridges worked with all the different layers and options. Well now that I understand, I'm going to teach you!
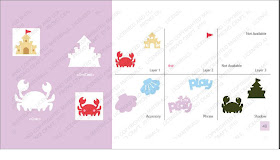
Let's look at a page from the "Create A Critter" Cartridge Handbook
The big purple box on the left shows you two things
#1) The first cut (in all white)
#2) What the completed animal will look like.
The other six boxes represent the different function keys on your keyboard. This is where things look tricky but they aren't!
On every single cartridge, the top image (on this page it would be the sandcastle) requires you to use the "shift button" on your keypad in addition to the function.
For example, let's say we want to cut the sandcastle. Because it's the top image we know we are going to need our shift button to cut it. Go ahead and press that. It's on the bottom left side of the keyboard.
Step One: Press the button with the crab on it on the keyboard. Load your paper and cut. You will get the bottom layer of the sandcastle which is the brown part in the completed photo.
Step Two: Press the Layer 1 function key on the top left corner of the keypad. This will cut the sand or cream colored part of the sandcastle.
Step Three: Press the Layer 2 function key. This will cut the red flag that goes on top of the sandcastle.
Your done! You just glue them all together and you have yourself a sandcastle! Now instead of the shift lock button we could have pressed the shift button right next to it every single time we made a cut on the sandcastle but instead we saved a little effort with the shift lock feature.
Now what if we wanted to cut that cut little crab out? Well, since it's on the bottom of the page, we would do exact what we just did, but we would not need to have our shift lock button on.
So remember this....Bottom image = No Shift Button Needed, Top Image ALWAYS = Shift Button.
So remember this....Bottom image = No Shift Button Needed, Top Image ALWAYS = Shift Button.
Not sure which cartridges to buy and start out with? Here are a few of my very favorites and why I like them...
1. Create a Critter - It has the cutest animals and very easy layering
2. Give a Hoot - The most adorable woodland themed cuts.
3. Country Life - Really fun country cuts with great font and numbers as well. Also it has pendant banner cuts.
4. Just Because Cards - Has everything you need to make a great looking card very quickly, and they are for all occasions.
I don't have a ton of cartridges but you don't need tons to make cute things! And don't ever, ever, ever buy a cartridge for full price or even close to full price. Custom Crops has fantastic prices on them and is always having sales and also Ebay is a great place to get them. Thanksgiving to New Years is the very best time to buy anything Cricut related at all. That's when I get most of my cartridges.
I hope you have enjoyed Lesson 3 and learned something! Please feel free to email me at auntielolocrafts (at) gmail (dot) com, anytime with questions!


I also love "give a hoot" it's one of my favorites! I have also been using "heritage" lately, it's a fun one. Thanks for another great lesson!
ReplyDeleteAhh I love my cricut! Haven't been able to use it much since I got it (recieved it as a gift before I started going back to school), but it just makes me happy! :)
ReplyDeletehttp://anotherwomack.blogspot.com/
Thanks for these tips, sometimes it is so much easier when someone else explains it to you then when you sit there and try to figure it out by reading the book!
ReplyDeleteThanks for sharing this at Fantastic Friday, I hope that you will join us again this week!
I bought the software called Sure-Cuts-A-Lot for my Cricut. It lets me use any image or font on my computer to design. I only need the one cartridge that my machine came with and now for the $69 cost of the software the possibilities are endless...just wish my time was!
ReplyDelete