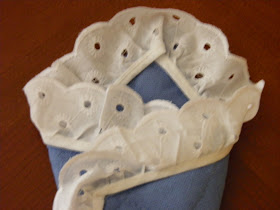
Hi y’all! I am thrilled to be guest-hosting again for Auntie Lolo’s Crafts today. I am Lacey Camp, a life-long crafter, who has now become a blog and Pinterest addict! Today, we are going to make a scissors holder. This is a great way to use up some of your scraps for embellishments! I used to make these years and years ago when I had a craft booth and they sold very quickly! I hope that you’ll enjoy making them as well.
Supplies:
glue gun
scissors
one potholder, loop MUST be in the corner of the potholder, not the middle
lace, multiply the sides of your potholder by 3 for the length (mine is 28”)
Basically, you can put anything you want on your potholder. It’s totally your preference. I am making this scissors holder for my future craft room (yes, I even have a board set up on Pinterest just for that room!). http://pinterest.com/laceydcamp/ I am hoping to have my craft room done this summer!
For instructions’ sake, please position your potholder as a diamond at all times, with the loop at the very top. This is your hanging loop and will keep you in perspective during this tutorial. Take your left corner and fold it straight across the potholder towards the middle (until the bottom corner is folded as well). This is the inside of your scissors holder and it is the only place we will not embellish. When you fold the right corner back over it, you will see the basic design. It should look like an ice cream cone. You can glue your potholder together now. Please note that I am aware you can see my glue at the tip. I tend to overdo adhesives but at least I don’t sniff them, right? Anyway, it won’t show in just a minute, I promise.
To begin to embellish your scissors holder, turn your potholder over to the back side. You will begin to glue on your lace at the bottom of the cone. I wrap my lace around the bottom just a tad so I know it will stick.
I like the eyelet on my potholder and didn’t mind the binding at the top to show; hence, I glued mine on top. (If I hadn’t liked it, I would have glued it beneath the edge of the potholder.) You should be able to use one length of lace to glue onto the entire front of the scissors holder. You will start at the back and glue from the bottom of the diamond up to the first corner, making a nice turn there. Don’t cut your lace, use it in one long piece. You can easily maneuver it.
Once you have finished attaching your lace to the right front of the cone, you will need to decide how you want to finish your scissors holder. Do you want your lace to cover the top edge of the potholder? I do because I don’t necessarily want everyone to realize it IS a potholder. This also leaves your hanging loop behind your lace so it’s easy to access. If that’s the look you want, you will have to jump your lace at the very edge of the cone then continue it again inside the lip of the cone down to the front left side, jumping it again to cover the last of the front of the cone. You can tell in this photo that I glue on one side before jumping it to the next side. Glue well so it will hold. When you are finishing the front left of the cone, note that you have to fold your lace onto itself to twist it upwards at the front to match the other side.
I felt my scissors holder still looked a little unfinished. I tied a bow with three lengths of white ribbon and glued it on to the front center. I then took my largest daisy button and glued it on top of the knot of the bow. Daisies are my favorite flower so I decided I needed a little bit more! I strung three more buttons onto the end of the bow and knotted right below where I wanted them to hang. What do you think? I didn’t choose the daisy buttons so that the orange matches my good scissors but, hey, it looks like I did, doesn’t it? Just saying……………..
Thanks for reading today! If you loved it, please pin it! Should you have any questions or comments, please leave them here and I will respond through Auntie Lolo. I will be guest-hosting on Auntie Lolo’s Crafts again this month and hope you will join me then as well.
Click below to follow Lacey on Pinterest!


What a cute scissors holder. It would make a great gift!
ReplyDeleteI love it! Excellent directions!
ReplyDeleteI have seen this and it is a cute idea that is usable.
ReplyDeleteVery useful. Never lose your good scissors again!
ReplyDeleteGood thing to keep at home!!!
ReplyDelete