Sunday, March 20, 2011

Iron On Vinyl T-Shirts

Thank you to everyone who entered the giveaway! I will be posting the winner shortly.

I have also been working on Cricut 101: Lesson 2 and will be posting that this week. I had no idea how long it would take the videos to upload to You Tube!

Until then, I will show you some T-shirts I made recently that I forgot to post about. I tried iron on vinyl for the first time and it was SO easy and fun!

I ordered the vinyl from Expressions Vinyl and used SCAL to design what I wanted to cut out on my Cricut. Expressions Vinyl even has a video on their website to teach you how to use the iron on vinyl. It was SUPER helpful!

My 10 year old nephew asked me to make him a "panther shirt". I didn't know what that meant so we went searching for panther images on google until we found one he liked. He requested an orange shirt. I got all the shirts at Hobby Lobby for 1/2 off. I think the kids shirts were a total of $2.00. 


It turned out great except for the fact that I forgot to take the eye out of the panther before ironing it on. Oh well :)

Of course I couldn't just make one nephew a shirt and not make one for his brother. Here's the batman shirt I made for my 3 year old nephew.


I then became slightly obsessed with iron on vinyl and made my sister a t-shirt that I've been thinking about making for a while now. She had a brain tumor over a year ago that was succesfully removed (thank goodness), then they found tumors all up and down her back and now she has 18 tumors in her neck. So this shirt fits perfectly :)

I hope you will all try the iron on vinyl!
post signature

Thursday, March 17, 2011

We Love Etsy Thursday!

I found such a great shop for our feature today!
 Eva Katharina makes beautiful things!
Here are some of my favorites...


post signature

Huge Bunnies Giveaway!!!!! NOW CLOSED.

I am so excited about this next giveaway!

I am giving away 2 felt bunnies AND a bunny wood block! Read below to find out how, it's so easy!!!!!


About a month ago I was asked to make a unicorn horn for a photo shoot by Tori Piercy Photography. Tori is a family friend and my sister's BFF. She told me it was for a contest she was entering and she wondered if one of our mini horses would be willing to wear the unicorn horn :) It sounded so adorable that I was determined to make it happen! Making the unicorn horn was the easy part, getting my mini-horse Bakersgirl to wear it was a different story :) But, we did it and the photo is incredible. So incredible that out of 1,000 photographers, she is in the Top Ten! Now it's time for the public to vote.

All you need to do is CLICK HERE to vote for Tori's photo called "Happily Ever After" (pictured below) and leave me a comment telling me you have voted. It is only one vote per email address but not household, so for example if your hubby or child votes with their email you can leave more comments and that will increase your chances of winning! And you can vote EVERYDAY! Which means you can leave me a comment everyday on this giveaway!!  
You do not have to be a follower of the blog to enter! Just vote for Tori's photo and tell me you did it! So easy!! And posting this on your facebook will get you another entry, just leave me a comment telling me!

Now I just have to figure out how to deal with a mini-horse who has a huge ego and wants to talk to agents :)

Closes at 12:01 am 3/21/11
post signature

Wednesday, March 16, 2011

Free Printables Wednesday!

Boy oh boy do I have some great printables for you today!
It's really hard to believe these are free but they are, and we love that! :)

Eighteen25 made 2 different birthday prints that you can either print out and frame OR make into a card! 


Lyndsay and the Johnson's made 6 different prints available to us for free! I love the different colors and messages. 
Such fun prints right?! Well I hope all of you are having a great Wednesday. Stay tuned for another giveaway coming up in the next little bit!  
post signature

Monday, March 14, 2011

Auntie Lolo's Etsy Shop

Lately I have been working hard to build my Etsy Shop, here is what I just added.....


Hi to all the new followers! Cricut 101: Lesson 2 will be coming this week!

post signature

Saturday, March 12, 2011

A Button Egg and Stuffed Bunnies!


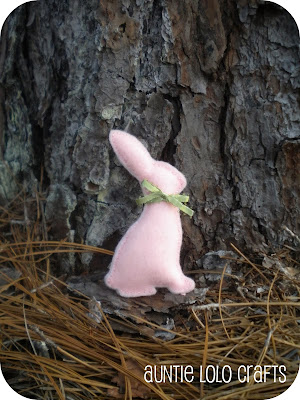
I've been itching to make something for Spring! I've been obsessed with Bunnies since I was a little girl. I even had bunny wall paper :) When I saw THIS on Sandy's Creations, I knew I had to make one! The pattern is free! Because me and my sewing machine never get along, I hand stitched mine and it was super easy. But if you have a good relationship with your sewing machine, I would use it instead :)
I made the tall bunny and then decided he needed a friend, so I shrank the pattern and made a smaller one. They were all done and looking cute but they really needed something, so I added ribbon around their necks, and as you can see from the top photo they look much better!

While I was stitching the bunnies I had an idea to take some brown burlap I had and put some buttons on it in the shape of an egg. I took some photos along the way. Here they are....

Step One: I took a piece of cardboard and cut it so that it measures 5x7.

Step Two: I cut a scrap of burlap and taped it to the cardboard.

Step Three: I took some chalk and drew an egg on the burlap. Since eggs are a pretty simple, I free handed it but if you aren't comfortable with that, you could find an egg on clip art and then print it out and trace it.

Step Four: Dump out all the buttons you own :) Okay, maybe just the colors you need. Place the buttons on the chalk egg you just traced. It will take a little bit to figure out where the buttons fit best, kind of like a puzzle. It won't be perfect but just try and fill all the spaces in the best you can.

Step Five: Once you have all the buttons where you want them, take some super glue (this is what works best for me) and glue each button down starting on the outside and working in. Just a little tab is fine because you are going to stitch the buttons on once the glue dries.

Step Six: When all the buttons are glued down, stitch the buttons into place.

Step Seven: Hot glue the burlap to the cardboard and put in frame!

Please let me know if you have any questions! I hope you will make this for your house too!

Click HERE to see which link parties I am joining.


post signature


Friday, March 11, 2011

Simple Cross Stitch


When my Martha Stewart Magazine came, I loved this idea and ripped it out. Then my sister came over and wanted a copy too :) So I thought I would share it with my blog friends! Martha featured some simple cross stitch patterns with just one color designs that you can take on the go. I love the fact that they are so simple and perfect for beginners. Go HERE for the patterns or get a template to make your own image into a cross stitch.
post signature

Monogram Frame

Lolly Jane is such a great blog and it is run by twin sisters! How fun is that?! I love this monogram frame they posted a few months ago.

They took this....
and turned it into this....

What a difference some paint and vinyl make! Please go to their blog for the whole tutorial.
post signature

Shamrock Tree Frame

Lindsey from Inspiring Creations made this super adorable Shamrock Tree from a $1 Michael's Frame. She gives a full tutorial on how to make one for yourself as well!

post signature

LUCK Scrabble Tile Magnets

How clever is Greenbean Crafterole? Seriously this St. Patty's Day Craft is so cute and smart! 

Go to Greenbean Crafterole's blog for all the details including a link where you can find the cute containers!
post signature
Related Posts Plugin for WordPress, Blogger...