Showing posts with label modge podge. Show all posts

Monday, March 7, 2011

St. Patrick's Day Frame Tutorial


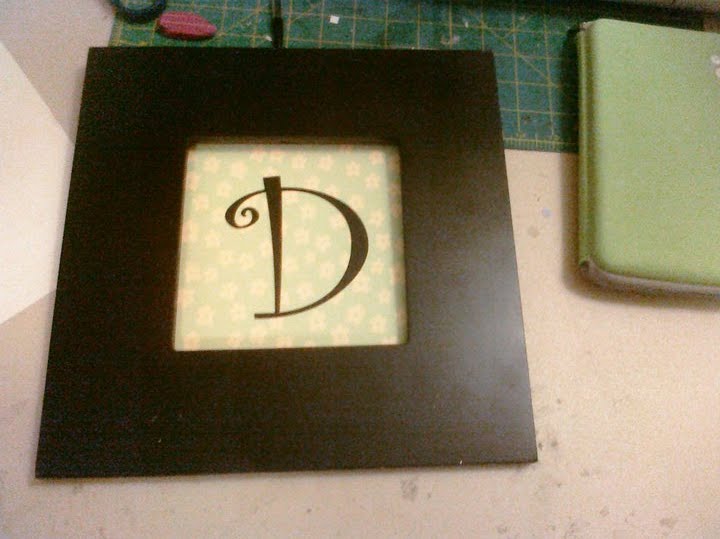
I had so much fun making THIS Valentine's Frame I decided to make another one for St. Patrick's Day. The total cost for the project was $1.50, love that! I purchased the wood frame at Michael's for $1.00 (they are always this price) and the scrapbook paper at Hobby Lobby for 50 cents.

Here is a tutorial so that you can make it too: 

Step 1: Trace the outside and inside of the frame on the scrapbook paper of our choice. I did this on the back so that I didn't have pencil lines. Cut out paper and set aside.

Step 2: Apply a thin layer of Modge Podge to entire
 top of the frame. The trick is not to wait too long to
put the paper on top of the modge podge and not to
put too much modge podge on the frame.
The photo above is what your frame should look like when the modge podge is applied correctly.

Step 3: Apply the paper you cut earlier to the top of the frame, use something (an old credit card, etc) to smooth the paper down onto the frame, working from the inside out. This will ensure that you don't have bubbles. If you have bubbles then you either put way too much modge podge or not enough. Let dry approx. 10 minutes.

Optional Step 4: Take a black marker and outline your frame. Let marker dry for 10 minutes before going to next step.

Step 5: Apply a thin layer a modge podge on top of the paper, in the photo above you can see what it should look like. If any bubbles appear, you can try to smooth them down but be careful not to rip your paper.

Step 6: While your frame is trying, glue a piece of cardstock on top of the square that came in the middle of the frame.

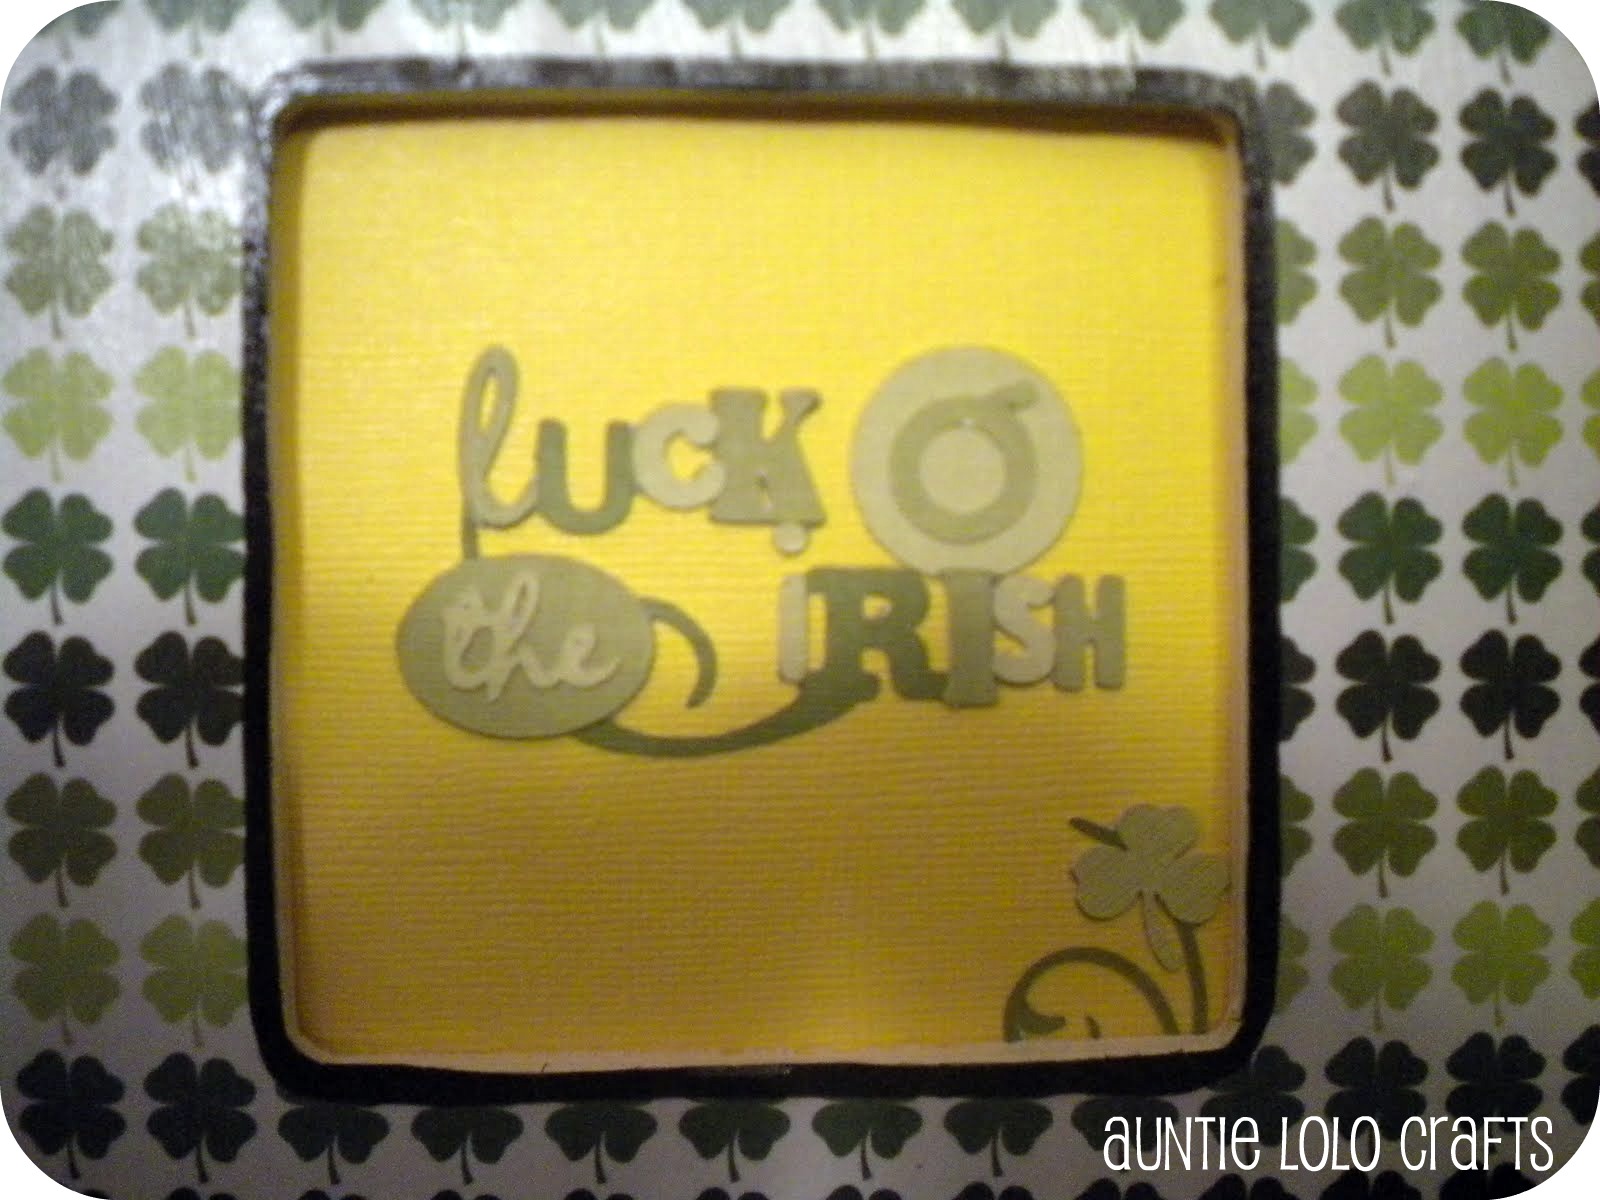
Step 7: Put something in the middle of the frame.
I chose to cut "Luck O' the Irish" out of the cricut
cartridge "Celebrate with Flourish". If you don't have
 a Cricut or this cartridge, anything St. Patty's Day
 related would be cute inside the frame!

Step 8: Your Done! Drink a diet coke (or your favorite drink) to celebrate! :)

HERE are the Linky Parties I will be joining!

post signature

Friday, February 11, 2011

Lost Socks Tutorial

We always have at least 3 socks that don't end up having matches after doing the laundry. It drives my husband crazy. He was thrilled when I decided to make a "home" for these lost socks until they find their mate.

For this tutorial I am going to do something a little different, I am going to feature TIPS! along the way so that your project turns out better/easier than mine did. :)


First I started out with a little board I got at Hobby Lobby for a little over a $1.00, it's about 12 by 6 inches. (This was before I knew about Habitat for Humanity Stores where wood is 50 cents or less)
I thought at first I would paint it....

But then I thought it needed something else. Oh and please know the yellow wasn't that bright but I cannot figure out my camera settings to save my life, keep this in mind throughout all the other photos...


So I modge podged my favorite paper onto the board,
right over the paint. It's called Bo Bunny Double Dot Paper, Sunflower. You may not be able to see, but there are cute little dots on the paper.

How to Modge Podge:

  1. Apply a medium amount of modge podge with a brush (i use those super cheap foam ones) to the board. Make sure that the board is COMPLETELY covered. But don't take so long that the modge podge starts to dry.
  2. Put paper on top of modge podge. Use an old credit card or bone folder to smooth down all of the paper. You may have some modge podge come out on the sides, that's okay, just wipe down with a paper towel. Keep smoothing until there are no bubbles.
  3. Let dry for approx. 10 minutes. Then you can put vinyl on top of the paper.
  4. If you are going to "ink" the edges, this is the time to do so.
  5. After applying the vinyl, put a very thin layer of modge podge on top of the vinyl
  6. Let dry 15 minutes before handling again.
I "inked" my edges with Tim Holtz' brown ink. All you do is hold the ink pad at an angle and go along the sides of your sign. You will get a thin layer of brown on the edges. Depending on how you tilt the ink pad, you can get more or less ink around the edges. If you don't have an ink pad, you can use a brown marker!


I used the program SCAL and my Cricut to cut the brown vinyl. Click HERE if you would like to download my SCAL file to use for your own sign.

After modge podging, inking and putting the vinyl on the sign, I whipped out my hot glue gun to attach the clothespins.

TIP! Measure the distance between clothespins before you hot glue them so you don't end up with some being closer than others and being super annoyed.

While you have your hot glue gun out, use it to attach the picture hanger to the back of your piece of wood.

TIP! Do not use the little nails they give you on this thin of a board, they will go through the board.

(btw, this is the real coloring of the sign and my laundry room walls)
Your done! Now go collect your lost socks and give them a new home. They (and your husband) will be thrilled!

(see the difference in coloring? crazy camera!)


post signature

Tuesday, February 8, 2011

2x4 Heart Tutorial

Under My Umbrella made the stinkin' cutest 2x4 wooden heart decoration ever! And there is a tutorial to boot!
 Love that. Check out their website!

post signature

L-O-V-E Blocks

The Crafting Chicks recently posted these LOVE blocks and I think they are so cute! Go to their website for instructions on how to make them for your home.


post signature

Tuesday, January 11, 2011

LOVE Frame with Tutorial!

I have been sick in bed with a cold for a few days but my mind has been going full speed thinking of cute Valentine's Day decorations! Here's a little tutorial (my first) on how to make this craft from a Michael's $1.00 Frame. This is a perfect project if you have never modge podged before!
 

Step One: Pick a cute paper to modge podge onto your frame. The thicker your paper is, the easier it is to modge podge.

Step Two: Gather supplies.

Modge Podge, Paper, Paint Brush, Bone Folder (or old credit card), Exacto Knife, Scissors, Pencil, Wood Frame

Step Three: Trace around frame and cut paper out.

Step Four: Apply thin coat of modge podge all over frame

Step Five: Line up the edges of the paper and the frame, when straight, put paper down and smooth onto frame with bone folder or old credit card.

Step Six: After letting dry for 3-5 minutes, take exacto knife and trim any paper that is hanging over the edges.

Step Seven: Color in edges and sides of frame with black marker (I used a Martha Stewart marker) or paint the sides. Oh, and I've used a sharpie before and it works great too!


Step Eight: While waiting for your marker or paint to dry, cut out 6 hearts. I did mine in a program called SCAL (then later cut with my cricut) starting at 2.5 inches and going smaller. But if you don't have a Cricut, you can use Word or just free hand it! That's what I used to do. I cut 2 red, 2 with vellum and 2 with pink.

Step Nine: Your marker should be dry now. Put a THIN layer of modge podge over your paper that is now attached to your frame. Put frame somewhere you won't touch it.

Step Ten: Glue paper hearts together. I did 2 at a time with zig glue, straight down the middle. Then after they were dry I attached all of them together.

Step Eleven: Plug hot glue gun in.


 Step Twelve: "Fluff" the heart layers up.

Step Thirteen: Remember the frame you put out of your reach? Well your allowed to touch it now that it's dry. Take your hot glue gun and attach your heart to the frame with it.


Step Fourteen: Cut a piece of pink (or color of your choice) card stock into a 3.5 x 3.5 square to cover the opening in the frame. I used my big-bad-ATG gun (but a glue stick will work too!) to attach the card stock right to the square piece of cardboard Michael's already put in the frame.


Step Fifteen: Are you still awake?! Good. Now, cut out the letters L-O-V-E. I did this in SCAL. But if you don't have that program, don't fret! Use Word or free hand it! The font I used was Bookman Old Style. Tilt the "O" and glue your letters down on the pink square you just made.


Step Sixteen: Put pink square into frame and your done!

I hope that you will try this project, especially if you are a beginner and don't modge podge often. It's incredibly inexpensive and if you follow the steps it should only take 30-1 hour to complete. If you make one, please let me know,
 I would love to see it!

Thursday, January 6, 2011

Always Kiss Me Goodnight FREE PRINT


I love this print! It's gorgeous and would be so easy to make yourself. Craftily Ever After has a great tutorial on making it and is so nice for giving the print to all of us for free!

Monday, December 13, 2010

Sparkly Dollar Frames.....

I think the $1.00 Michael's wooden frames have endless possibilities! I love how these are decorated from Joy is at Home. And there is a full tutorial on how to make them!

Sunday, December 5, 2010

Merry Christmas Sign


I wanted to make a simple "Merry Christmas" sign to put out this year. I took a piece of really thin wood from Hobby Lobby  and modge podged a piece of Bo Bunny Dotted Red Paper (my favorite paper ever) onto it. You can't see the dots in the picture very well but in person they are really cute and subtle. Then I took a black ink pad and "inked" the edges. After that was dry I printed out "Merry Christmas" in black vinyl and that was it, project done! Sorry it's not a very good photo but I think you get the idea. My inspiration was THIS board done by the Crafting Chicks.


Friday, December 3, 2010

2x4 Christmas Trees

I found another great blog that I had never been to (lots of other people have though!) It's called Under My Umbrella and they created these amazing 2x4 Christmas Trees
and have a great tutorial for us too.

Wednesday, November 3, 2010

Birthday Countdown Blocks

Scrappy Critters made these really cute Birthday Countdown Blocks. I have seen blocks similiar to these for other holidays but I just really love the paper she used and that it's for birthday's.  I need to make one of these!

Tuesday, November 2, 2010

Be Thankful Board

Oh The Crafting Chicks blog is always full of fabulous ideas! Here is another one with a full tutorial. Please click on their blog name to see the tutorial and items needed to make this.
 I have this paper and I definitely think that's a sign I need
 a make a board like this :)


Friday, September 24, 2010

Tile Coasters

This was such a fun and easy project to make!
I cannot wait to make more! The tiles cost 16 cents each! Love it. I learned how to make them and got the idea from Blueprint Crafts. They have a great tutorial on how to make them. Also, I tested them out and they really do work.
 I wanted to make sure the clear acrylic spray that I used
 to seal them worked before I gave them away as presents. That would be ackward :)

Sunday, September 19, 2010

Fabric Covered Mat

I really like finding things I've never seen or thought of doing. Just like this fabric mat by Delightful Distractions.
Just another reason to love Modge Podge!
Please go to their blog for the full tutorial.

Friday, September 17, 2010

Halloween Decoupage Frame

It's not very often that I decoupage something
that's not a Character. Tonight was exciting!
I found this frame a few weeks ago at a thrift store and haven't been able to decide what to do with it. I actually have 2 of these frames. So first, I spray painted it black.
 Then, I got inspired by some of my dollar
spot Target scrapbook paper.
Now I'm stuck again and can't quite decide what do with it. So....please tell me what you think. I was thinking of putting a vinyl image in the middle or words....not sure. 
Please leave me a comment with your ideas!!

Here are some upclose photos of the paper.
It has some glitter in it too, love it!

Thursday, September 16, 2010

Spider Plaque from the Dollar Store

One Frazzled Momma found this really ugly
 wood plaque  at the dollar store and turned it
into something so cute for Halloween!
Here is the before:
After some paint, scrapbook paper and
 modge podge, here is the after:
Holy Cow that's a HUGE improvement!!

Monday, September 13, 2010

Star Wars Eye Chart

I was so excited when I saw Modge Podge Rocks 
feature this Star Wars Eye Chart from Hodge:Podge
I know my hubby is going to want one. And my nephews.
And my friends hubby's. Ok and me. :)
I LOVE IT!

The best part? All she used was a computer,
canvas and modge podge!
Related Posts Plugin for WordPress, Blogger...